256 Colour Tutorial Part 2
Palette effects using pre-defined functions
(by Gilbert Cheung)
In Part 1 we have learnt about how to create and import 256 colour images for use with AGS games. Let's move on to some applications.
If you want to reproduce the stunning colour effects like in old VGA or Amiga games created in the early 90's this tutorial is for you. I'll demonstrate some simple ways of doing these effects using palette here.
For you to use palette effects successfully it is assumed that you are already familiar with the scripting system of AGS. Since this tutorial is not aimed for basic users, I suppose those who are reading this have subtle amount of knowledge in scripting already.
If you read through the AGS manual, you'll find out that there're only three (3) functions that are related to palettes:
 CyclePalette()
 SetPalRGB()
 UpdatePalette()
Though there aren't much to do with them, they provide enough function for us to do some pretty decent effects already.
Before we start, remember, we need materials from the last part to continue on with this tutorial. If you had done the steps as described in the last part to import the backgrounds and sprites into an AGS "game" you should get them ready, or download this file to have something to base on.
Palette cycling
Do you remember the warp scenes in Space Quest IV? The colourful backgrounds animated smoothly. How did they do that? Paint each frame of the backgrounds with different colours, and then display them one by one? Nah, that's just a waste of time and memory. But how? Use palettes! Use the CyclePalette() function in AGS!
Now, how does this function work? Read the manual first:
CyclePalette
CyclePalette (int start, int end)
This is used for special effects, like the flowing colours on the Space Quest 4 title screen, and the Sierra logo of the later Sierra games.
The palette indexes from START to END are cycled around one slot.
Using this call in a repeatedly_execute function gives the effect of animation.
By default, the colours rotate leftwards through the palette. If you pass the arguments the other way round (ie. START being larger than END) then the colours will rotate in the opposite direction.
NOTE: This command only works in 256-colour games.
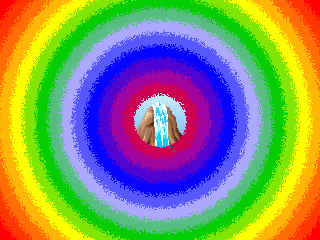
Don't get confused, yet. It's not really that hard. Let me demonstrate it with an example. You may still remember that I made this background in Part 1, and its palette is like:

You may have noticed that, I used the "rainbow" colours in slots #240 through #253 (the first 14 slots in the last line of the above palette) to draw the circular "warping frame" of the background. If the colours of these slots are altered the colours of that "warping frame" will be changed accordingly (you can load the background into a graphics programme and play with the colours of these slots and see what will happen). To make an animated effect, you may try using the function CyclePalette() with #240 as the starting slot and #253 as the ending slot. Here's a graphical illustration of what will happen if you do that:

Whenever the function CyclePalette(240, 253) is executed, the colours in these slots are shifted to the left by one slot, and the original colour in the first slot (#240) will be warped to the last slot (#253). Similarly, if we swap the two parameters of this function the direction of the shifting of the colours will be reversed.
Now, let's decide where to put the codes in. For example, I want the colours to cycle in the forward direction whenever I press the Space Bar, and in the backwards direction when I press the Backspace, so I type this into the room's script:
 function on_key_press(eKeyCode key){
   if (key==eKeySpace) CyclePalette(240, 253);
   if (key==eKeyBackspace) CyclePalette(253, 240);
 }
Save the script and compile the game to test it, you'll notice that whenever you press the Space Bar, the colours of the "warping frame" changes. This is due to the shift in colours in the mentioned 14 colour slots. If you keep the Space Bar pressed you'll see a smooth colour rotation animation. Try it out also with the Backspace key.
I'm not satisfied with this yet, now I want the water at the centre to fall continuously. What can we do now? Again, we can use CyclePalette(). We can use this in the repeatedly_execute() or the repeatedly_execute_always() events for the continuous motion. Now, look at the background again. You'll see that the waterfall was carefully drawn using colours mostly from slot #208 through #215. I want the animation to play without any interruptions, so I add the following into the room's script:
 function repeatedly_execute_always() {
   CyclePalette(208, 215);
 }
Again, save the script and test it... WOAH! The water moves! But it seems a bit too fast, isn't it? Just do some small tweaking to the above codes (I won't go into details about how that works, as you should already have enough scripting knowledge to read this tutorial):
First, add this to the top of the room's script:
int waterflow=5;
Then, modify the repeatedly_execute_always() function like this:
 function repeatedly_execute_always() {
   waterflow--;
   if (waterflow==0){
     CyclePalette(208,215);
     waterflow=5;
   }
 }
Test the game again. The animation is now slower and looks better. You may have noticed that some of teh white pixels on the water won't animate. This is because I drew them with a colour not using the slots included in the cycle. If you care, they're actually using colour slot #15 (instead of slot #215 in the cycle), which is a "Gamewide" "sprite" colour. From this you'll know that it may not be a bad practice to use duplicated colours in a 256 colour image, as there may be cases that you want the colour of a pixel to be changed somewhere in-game (like in a palette rotation animation, say for example) while keeping the colour of another pixel unchanged. This is true as long as you manage your palette wisely in a systematic way.
Changing an individual colour
Sometimes you may want to change the colour of a particular slot for some reasons, in such case you may check out the function SetPalRGB(). Again, let me just copy something from the AGS manual to bloat this space a bit:
SetPalRGB
SetPalRGB (int slot, int red, int green, int blue)
Changes the RGB components of one of the palette slots. The palette is initially set up in the Palette Editor, but you can override it during the game using this function for special effects.
The RED, GREEN and BLUE parameters each range from 0 to 63 (as used in the Palette Editor).
If SLOT is a background slot, then this function's effect will last until the player changes screen, when the palette is changed to the new room's palette. If SLOT is not a background slot, the effect of this function is permanent.
NOTE: This function will allow you to change the colours which are "locked" in the AGS Editor. However, you should not normally do this as it can cause strange colours in the game.
(By "locked" colours in the last sentence of the description it is actually referring to slots #0 through #16, which are normally considered to be used by the system engine and are not advised to change.)
Well, I won't bother explaining the above word by word. Basically what this function does, is to change the colour of a slot directly, and all pixels on-screen which use this slot will be changed to the new colour immediately. Let's illustrate this with an example, remember the sprites we used in Part 1? Consider the girl sprite:
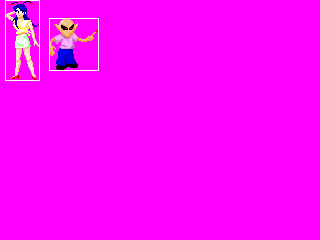
If you check, you'll see that the red tips of her antennae were drawn using colour slot #32. Suppose you want them to alter between black and red colours endlessly throughout the whole game, what we can do is, in each game loop, if the colour of slot #32 is currently red, change it to black (where the (R, G, B) tuple equals (0, 0, 0) ), else change it to red (where the (R, G, B) tuple equals (63, 0, 0) ). This logic can be visualised as follows:
First, add on top of the Global Script:
int antennaecol=1; //variable to keep track of the colour change
Then, add the following to the Global Script:
 function repeatedly_execute_always() {
   if (antennaecol==0) {
     antennaecol=1;
     SetPalRGB (32, 63, 0, 0); //(63, 0, 0) is red
   } else {
     antennaecol=0;
     SetPalRGB (32, 0, 0, 0); //(0, 0, 0) is black
   }
 }
Save your script and test the game, you may notice two things:
- Though the girl's shoes were also painted in red, their colours won't flash like her antennae, since I didn't use slot #32 when painting her shoes. If you check this in the room with the "disco" background, you'll see that the red "light" on the door lock won't flash either, because of the same reason.
- If you place also the alien sprite in a room, you may notice that his fingertip flashes also. This is because I also used colour slot #32 there. If you check the room with the "disco" background, you'll find out that a pixel just above the disco ball also flashes.
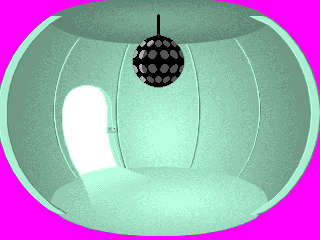
Combining the above observations I hope you can get a hang on how to manage your palettes and images more wisely when you paint them.
Now, let's do a more interesting effect. Suppose we don't want the girl's antenna tips to flash quickly, but want the colour to fade in and out gradually, what can we do? Well, we may make the following modifications to the above codes:
int antennaecol=63, antennaefade=-1;
Also:
 function repeatedly_execute_always() {
   antennaecol+=antennaefade;
   if (antennaecol==0) antennaefade=1; //Fade in
   else if (antennaecol==63) antennaefade=-1; //Fade out
   SetPalRGB (32, antennaecol, 0, 0); //Alter the intensity of the R-channel
 }
Again, save your script and test the game. Got it already?
Above are just some small examples on how to modify individual palette slots using SetPalRGB(). You may experiment yourself, like changing other slots, changing some of the slots into other crazy colours, etc. You may even think of some colour animations, with colour changes decided by some mathematical formulae. Everything is left to your imaginations. But always bear in mind that whenever you use SetPalRGB(), the R-, G-, B- channel values must be within the allowed range of 0 through 63.
Conclusion
This part of the tutorial is quite short compared to the others, but I think the effects are interesting enough for you to try. You may ask, "HEY! What about the UpdatePalette() function?" Well, I won't cover the usage of this function in detail here, as it's not yet useful in this stage. In the next and last part of the tutorial, however, this function plays a very important role, when you want more low-level control of the palette, so I'll end this part here. Again I'll give you another present:
Which is merely just the above materials put together into an AGS "game". To test it just unzip it into an empty folder and load up Game.agf via the AGS editor and press F5 to test it. room1.crm is the "dizzy" room, where you can click to transport you to room2.crm, which is the "disco" room, where you can click on the door(way) to toggle between opening and closing of the door. You'll notice also that the light on the door lock will change colour according to the status of the door. You can read the room script for more info on how to do this. If you're having enough "fun" just press ctrl-Q to quit.
Downloadable files used in this part
- ZIP file - Part 1 stuff
- BMP image - the Girl and the Alien sprites
- BMP image - "Dizzy" background
- BMP image - "Disco" background
- ZIP file - Part 2 stuff (new in this part)
Coming next - Part 3: Full control of palette effects
(Return to Using 256 colour graphics in AGS)