Hello everyone,
I thought to post a quick tutorial on how to get a nice effective old skool CRT look, however I had a look about the forum index and saw no specific area related to posting tutorials. My apologies if I have posted this into the wrong section.
Ok so I really like that old CRT look, in particular when it comes to pixel art. Over the years I have seen various games and emulators try to simulate various styles of scan-lines and CRT looks, however I have rarely (if ever) seen ones that try to simulate the actual RGB component to each cell on a CRT screen. This style may not be to everyone's taste though.
Anyway I thought to try come up with something effective and thought to post my method here on the AGS forum since many of you are working at the pixel art level. This method could be applied to any lod res , however Its designed and most effective for pixel art styles.
So first of all to make this work you have to understand that you must upscale your artwork to at least 300%. This means for every pixel of your art work it will now have 9 pixels of detail, this will be needed for 2 reasons, the first reason is to get Red Green and Blue going horizontally across each of your pixels, and the second reason is you will simulate the CRT cell beveling at the top and bottom of this 3x3 pixel.
This upscaling of art work may obviously not work with some projects since those projects would be locked to a certain game res, but in general this is just the method and could in theory be applied to any game no matter its res.
Ok here are the very simple steps, and underneath are images of the process and underneath that is another image demonstrating how effective it can be.
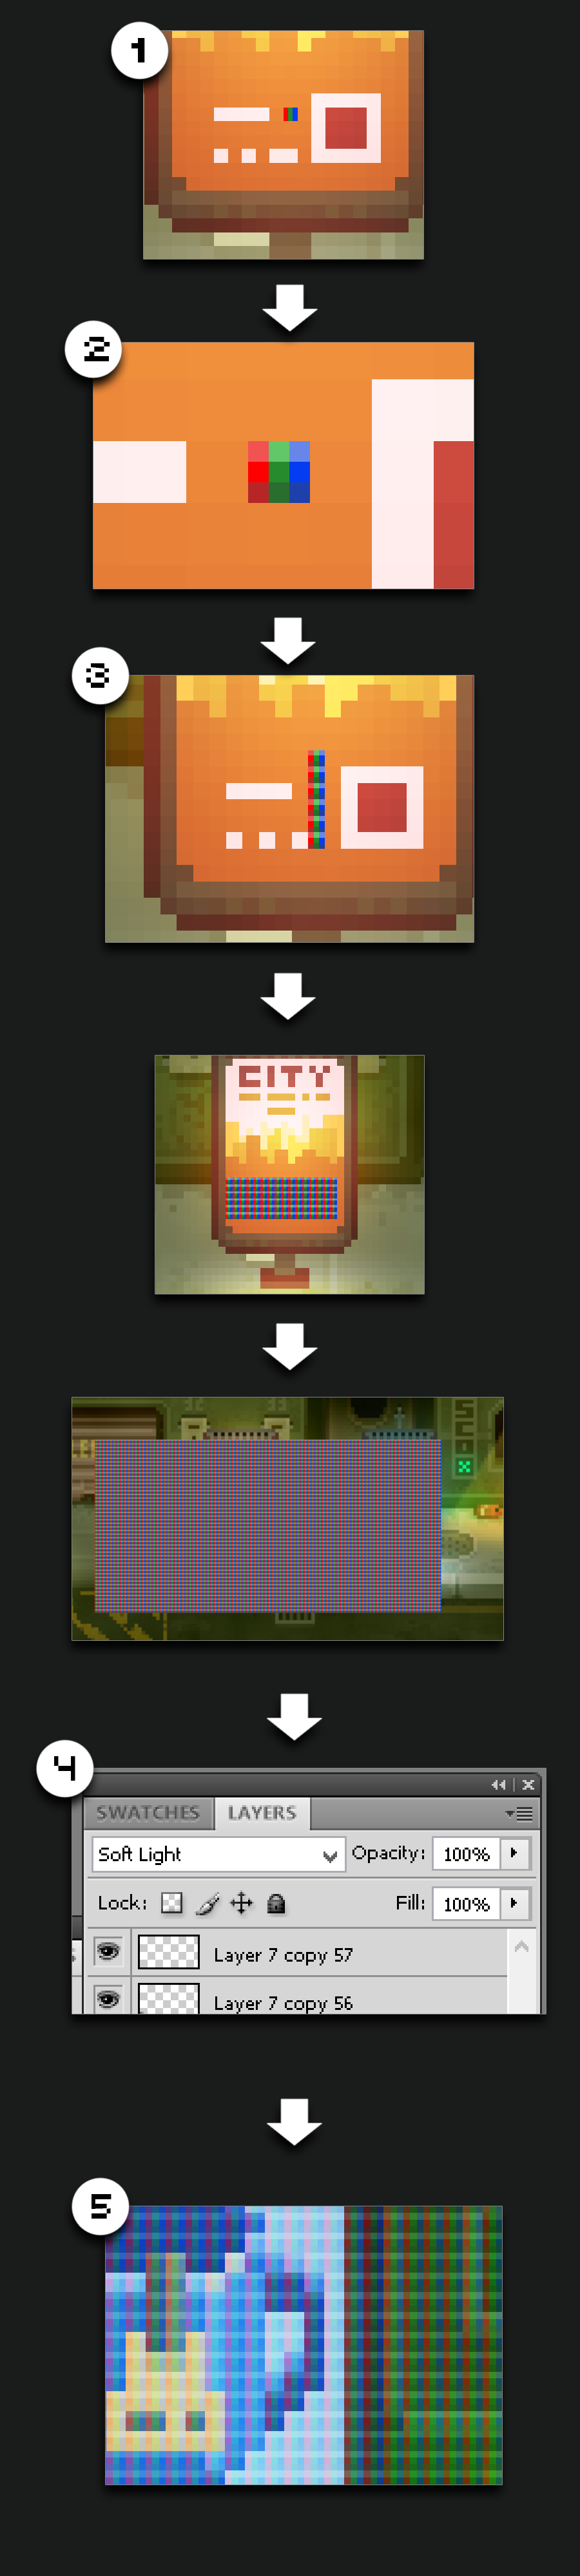
Step 1:
Up-Scale your raw pixel art work up by 300% using nearest neighbor scaling (to avoid aa/blurring)
then zoom right in on one of your artwork pixels (which is now 3x3 pixels), then simply paint 3 vertical lines of 3 pixels, Red, Green and Blue. (Make sure to keep neatly inside your art work pixel)
Step 2
Now to simulate the slight bevel you see on CRT cells if you look close enough. Either apply a bevel or just paint lighter shade of Red,Green, Blue on the top row of 3 pixels, then at the bottom row of 3 pixels paint in darker R, G, B colors.
Step 3
Now you simply (but very carefully) copy and paste this to make a row,, then copy that row to make a block, and copy that block.. and so on. But its very import to take care that in each of your art work pixels the RGB cell is sitting in snug, with the highlight of the bevel on top and the dark part on the bottom and the Red component starting first.
Step 4
Once you have the whole of your image covered , simply use a "Soft Light" layer blend and your done. No need to touch Opacity settings. In this example I am using PS, however most GFX software that has layers will have a close equivalent to PS Layer Blends.
Step 5
On zooming right in you can make sure you didn't go wrong with the copy/pasting of the cells/rows..etc
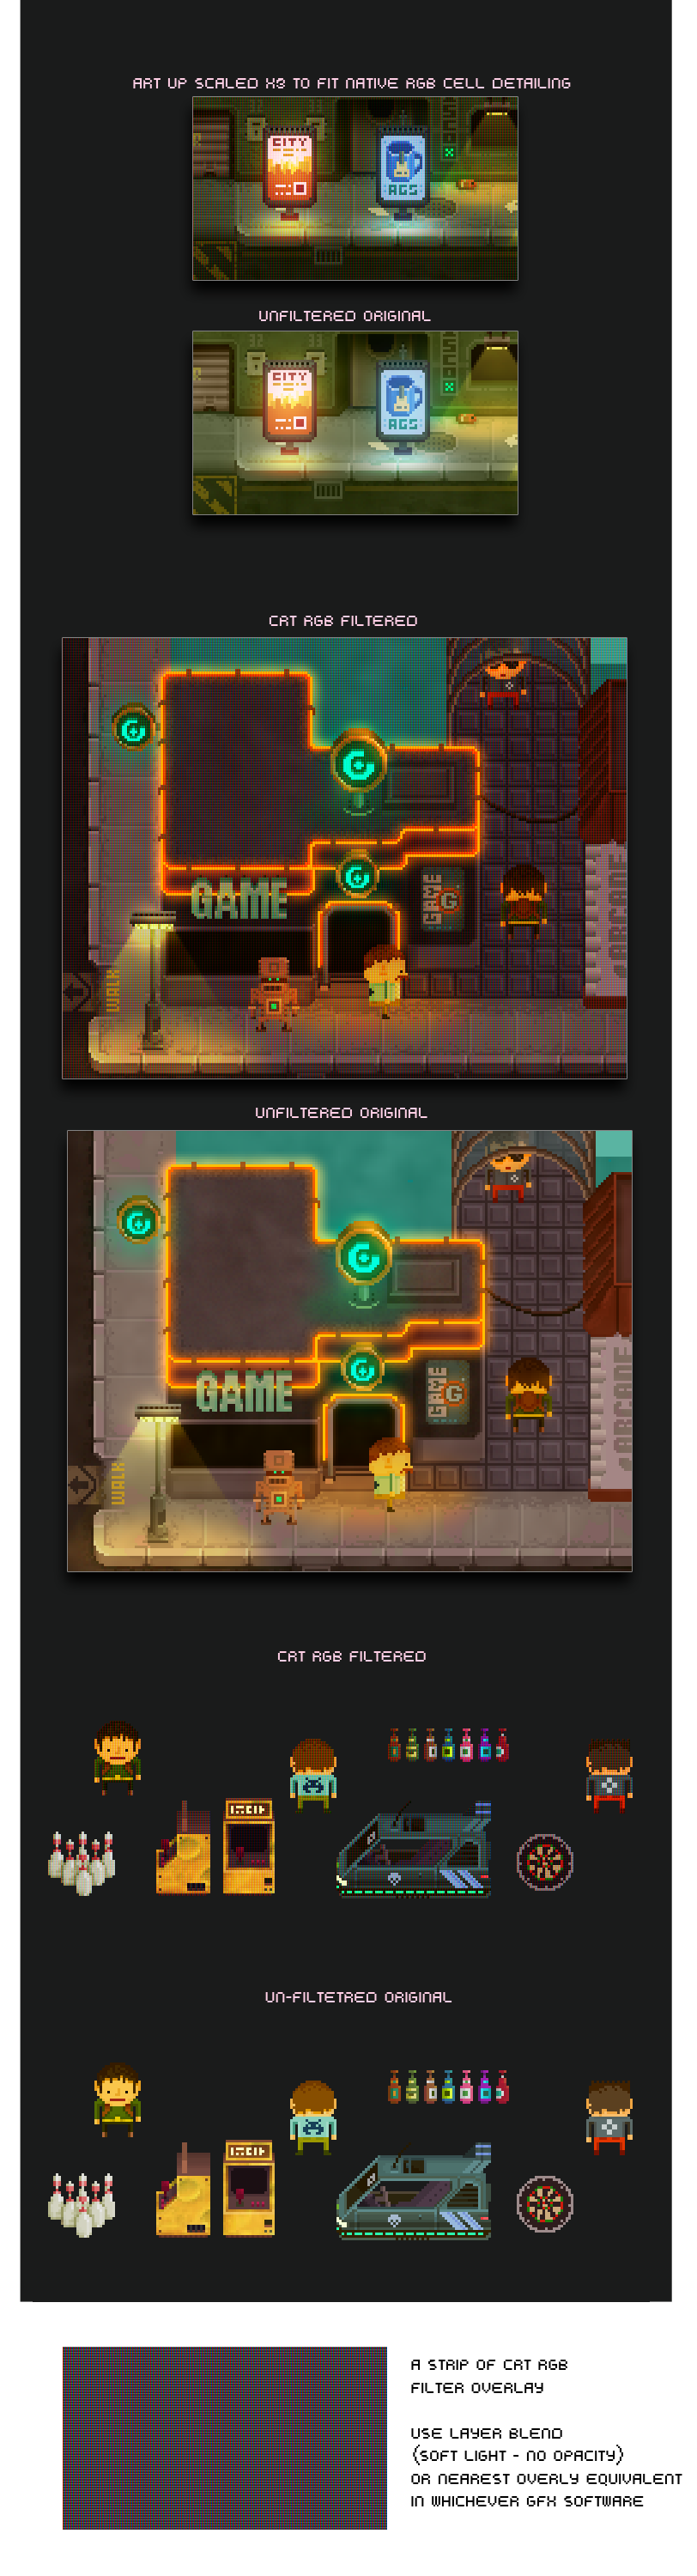
And here are some examples of how effective this overlay filtering can be. , I have also provided you with a strip of overlay filter at the very bottom that's on a transparent background so if your too lazy to make it your self, just grab that and copy/paste until you have your image covered. (you will still need to apply a layer blend such as Soft Light)
You could bake this overlay effect into your image, or in theory it could be used as a real-time screen overlay filter in a game engine however I am not sure AGS could do that.
There is one disadvantage to this CRT effect in that it darkens the image slightly, however due to the nature of the effect its kind of unavoidable , but its authentic to how a CRT would do it. You could brighten your under lay image up or brighten your baked image but you might run the risk of washing the colors out a bit then.
Anyway have fun with it, hope it's useful to someone out there.

I thought to post a quick tutorial on how to get a nice effective old skool CRT look, however I had a look about the forum index and saw no specific area related to posting tutorials. My apologies if I have posted this into the wrong section.
Ok so I really like that old CRT look, in particular when it comes to pixel art. Over the years I have seen various games and emulators try to simulate various styles of scan-lines and CRT looks, however I have rarely (if ever) seen ones that try to simulate the actual RGB component to each cell on a CRT screen. This style may not be to everyone's taste though.
Anyway I thought to try come up with something effective and thought to post my method here on the AGS forum since many of you are working at the pixel art level. This method could be applied to any lod res , however Its designed and most effective for pixel art styles.
So first of all to make this work you have to understand that you must upscale your artwork to at least 300%. This means for every pixel of your art work it will now have 9 pixels of detail, this will be needed for 2 reasons, the first reason is to get Red Green and Blue going horizontally across each of your pixels, and the second reason is you will simulate the CRT cell beveling at the top and bottom of this 3x3 pixel.
This upscaling of art work may obviously not work with some projects since those projects would be locked to a certain game res, but in general this is just the method and could in theory be applied to any game no matter its res.
Ok here are the very simple steps, and underneath are images of the process and underneath that is another image demonstrating how effective it can be.
Step 1:
Up-Scale your raw pixel art work up by 300% using nearest neighbor scaling (to avoid aa/blurring)
then zoom right in on one of your artwork pixels (which is now 3x3 pixels), then simply paint 3 vertical lines of 3 pixels, Red, Green and Blue. (Make sure to keep neatly inside your art work pixel)
Step 2
Now to simulate the slight bevel you see on CRT cells if you look close enough. Either apply a bevel or just paint lighter shade of Red,Green, Blue on the top row of 3 pixels, then at the bottom row of 3 pixels paint in darker R, G, B colors.
Step 3
Now you simply (but very carefully) copy and paste this to make a row,, then copy that row to make a block, and copy that block.. and so on. But its very import to take care that in each of your art work pixels the RGB cell is sitting in snug, with the highlight of the bevel on top and the dark part on the bottom and the Red component starting first.
Step 4
Once you have the whole of your image covered , simply use a "Soft Light" layer blend and your done. No need to touch Opacity settings. In this example I am using PS, however most GFX software that has layers will have a close equivalent to PS Layer Blends.
Step 5
On zooming right in you can make sure you didn't go wrong with the copy/pasting of the cells/rows..etc
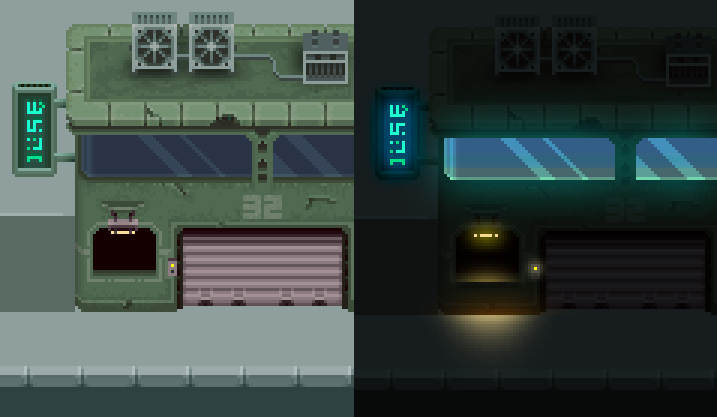
And here are some examples of how effective this overlay filtering can be. , I have also provided you with a strip of overlay filter at the very bottom that's on a transparent background so if your too lazy to make it your self, just grab that and copy/paste until you have your image covered. (you will still need to apply a layer blend such as Soft Light)
You could bake this overlay effect into your image, or in theory it could be used as a real-time screen overlay filter in a game engine however I am not sure AGS could do that.
There is one disadvantage to this CRT effect in that it darkens the image slightly, however due to the nature of the effect its kind of unavoidable , but its authentic to how a CRT would do it. You could brighten your under lay image up or brighten your baked image but you might run the risk of washing the colors out a bit then.
Anyway have fun with it, hope it's useful to someone out there.